For some time now I’ve been interested in how black-and-white images can be converted to color. I even played around with converting old video to color as seen below in the now almost 5-year-old video test.
This was impossible just some 8 years ago as grayscale images do not contain sufficient information to create a color image. In instances where you see B&W/Grayscale images converted to color, it had to be done manually in an application such as Photoshop.
The first use of neural networks in the colorization of black-and-white images was presented at 2016 SIGGRAPH by Satoshi Iizuka, Edgar Simo-Serra, and Hiroshi Ishikawa. SIGGRAPH (Special Interest Group on Computer Graphics and Interactive Techniques) is an annual conference on computer graphics where a lot of very interesting advances in computer graphics are presented for the first time.
At its simplest Colorization of Black and White images is just a bunch of guessing as we only get luminance information and little else. Color can vary greatly by environmental lighting.
First a little technical background about Color and how its represented digitally.
Grayscale images are represented using a single channel, where each pixel corresponds to a specific brightness value ranging from black to white or from 0 to 255. On the other hand, Red, Green, and Blue color images consist of three color channels: red, green, and blue where each pixel in an image is represented by three values, indicating the intensity of each color in a pixel. For example, the color below is a mix of 100% Red, 0% Green, and 40% Blue.

By combining these color channels, a wide range of colors can be represented.
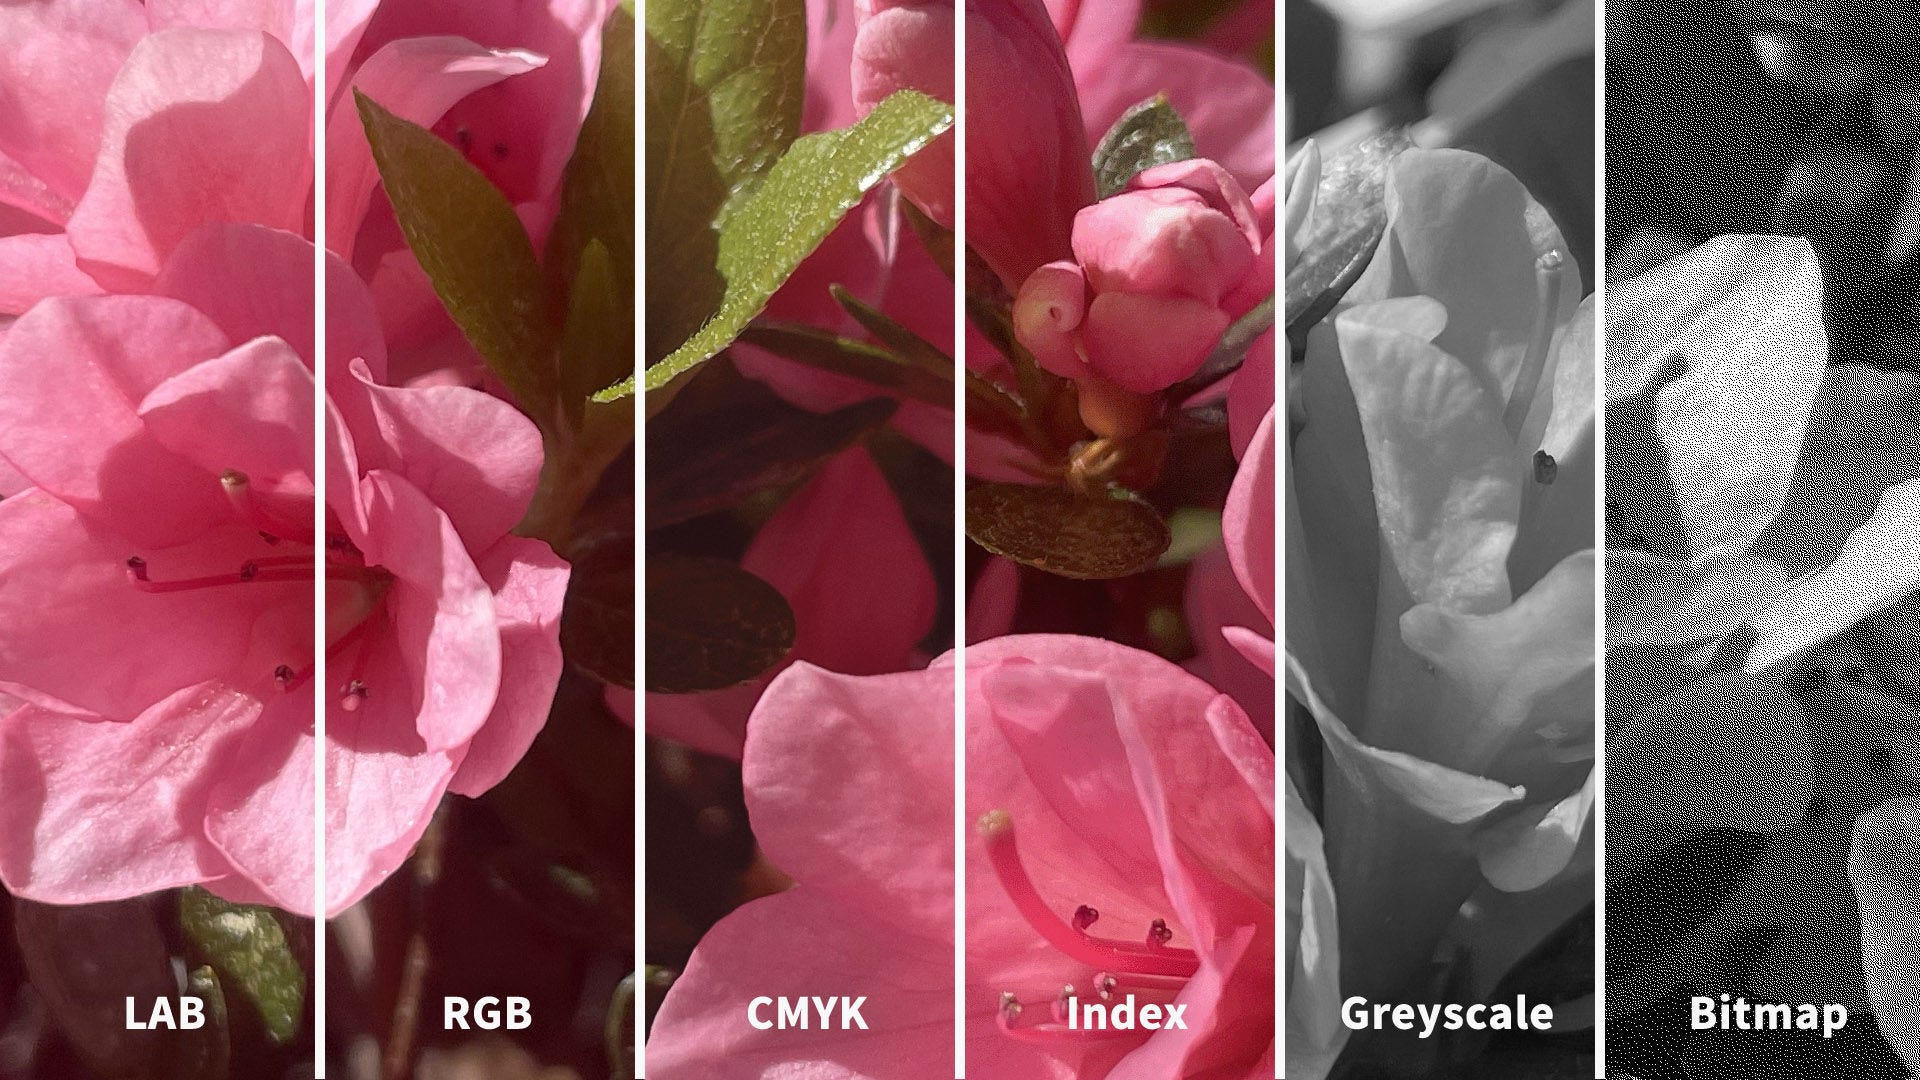
There are other color models or spaces in computer graphics not just Grayscale or RGB. They define how colors are represented and organized in digital images or computer graphics. Color modes determine how colors are represented numerically, and displayed on various devices. Each color mode has its own characteristics and purpose, allowing for different ways to perceive and work with colors. Some of the commonly used color spaces are
RGB (Red, Green, Blue): RGB is an additive color model widely used in electronic displays, cameras, and digital imaging. It represents colors by combining varying intensities of red, green, and blue primary colors. Each pixel is specified by three values, indicating the intensity of each color channel.
CMYK (Cyan, Magenta, Yellow, Key/Black): CMYK is a subtractive color model primarily used in printing and reproduction processes. It represents colors by subtracting varying amounts of cyan, magenta, yellow, and black ink from a white background. CMYK is designed to simulate the absorption of light by ink on paper, and it is particularly suitable for achieving accurate color reproduction in print materials.
HSL (Hue, Saturation, Lightness): HSL is a cylindrical color model that represents colors based on their hue, saturation, and lightness values. Hue defines the actual color, saturation determines the purity or intensity of the color, and lightness indicates the brightness or darkness of the color. HSL provides a more intuitive way of describing colors and is commonly used in graphic design and color manipulation tasks. There is a similar color space called HSV (Hue, Saturation, Value). Instead of lightness, HSV uses value (V), which represents the perceived brightness of a color. Hue and saturation remain the same as in the HSL model. HSV is often used in computer graphics, image processing, and color selection tools.
Lab or CIELAB (Lightness, a, b): Lab is a perceptual color space designed to approximate human vision and color perception. It consists of a lightness component (L) and two chromatic components (a and b). The a-axis represents colors from green to red, and the b-axis represents colors from blue to yellow. The A and B channels in LAB are independent of the brightness component (L). This independence allows for separate manipulation and adjustment of color information while preserving the grayscale component. The Lightness channel (L) has a scale from 0 to 100, while the Color channels (A and B) range from +127 to -128, representing the Green-Red Axis and Blue-Yellow Axis, respectively. Lab color space is widely used in color science, color management, and color-related research and is of special interest to us for the colorization of old black-and-white images.

These are just a few examples of color modes, and there are several other color spaces, such as YUV, and Adobe RGB, each with its own purpose and specific applications.
To introduce color we first convert the greyscale image to LAB color space. This conversion separates the image into the L channel which will represent the grayscale information and the A and B channels which are representing currently non-existing color information.
Now, we can play around with A and B color channels. By tuning them we can introduce color information. Of course, this will be more trial and error. This can be done in various ways, such as with users providing color hints or strokes on the A and B channels to guide the colorization process or by statistical mapping from a reference dataset that can be used to map grayscale values to appropriate A and B values.
In recent years Machine Learning algorithms have been trained on a large dataset of colorized images to learn the relationship between grayscale and LAB colors.
It is important to note that we can convert any Color Space to any other without too much trouble so once we finish with colorization in LAB color space we can convert it to more popular RGB color space without much issue. Not to say there are none as LAB is a massive color space with 8-bit integer RGB being only a tiny subset so some data will be lost but in our case where we are starting with a deficiency of information we actually end up with more color information than we started with so no issue there.

Now, let’s turn our sights to actual colorization. After all that color theory it must be a pain in the but it’s not. See the phun I just did there?
As with anything AI touches it has become super simple to bring old photos back to life and one of the best free ways of doing so is with DeOldify. It's fully open-source with extensive guides about training, testing, and whatever you like. Its most advanced version is powering the MyHeritage InColor site. As I said, there is a plethora of information on their GitHub.
As you might know, I’m a fan of Jupyter Notebook, and DeOldify have you covered there but what I’m mostly interested in here is the availability of the .NET version of it. This removes any and all interaction of the user with the underlying code and enables “normal” users to quickly and easily colorize their old images.
No need for expensive hardware or specialized websites. Just go to the DeOldify.NET GitHub page and go to the release page to download. To use it just add your image to the right side of the app and press DeOldify! button. Thats it. The interface is a bit oldifieded itself but it does the job.
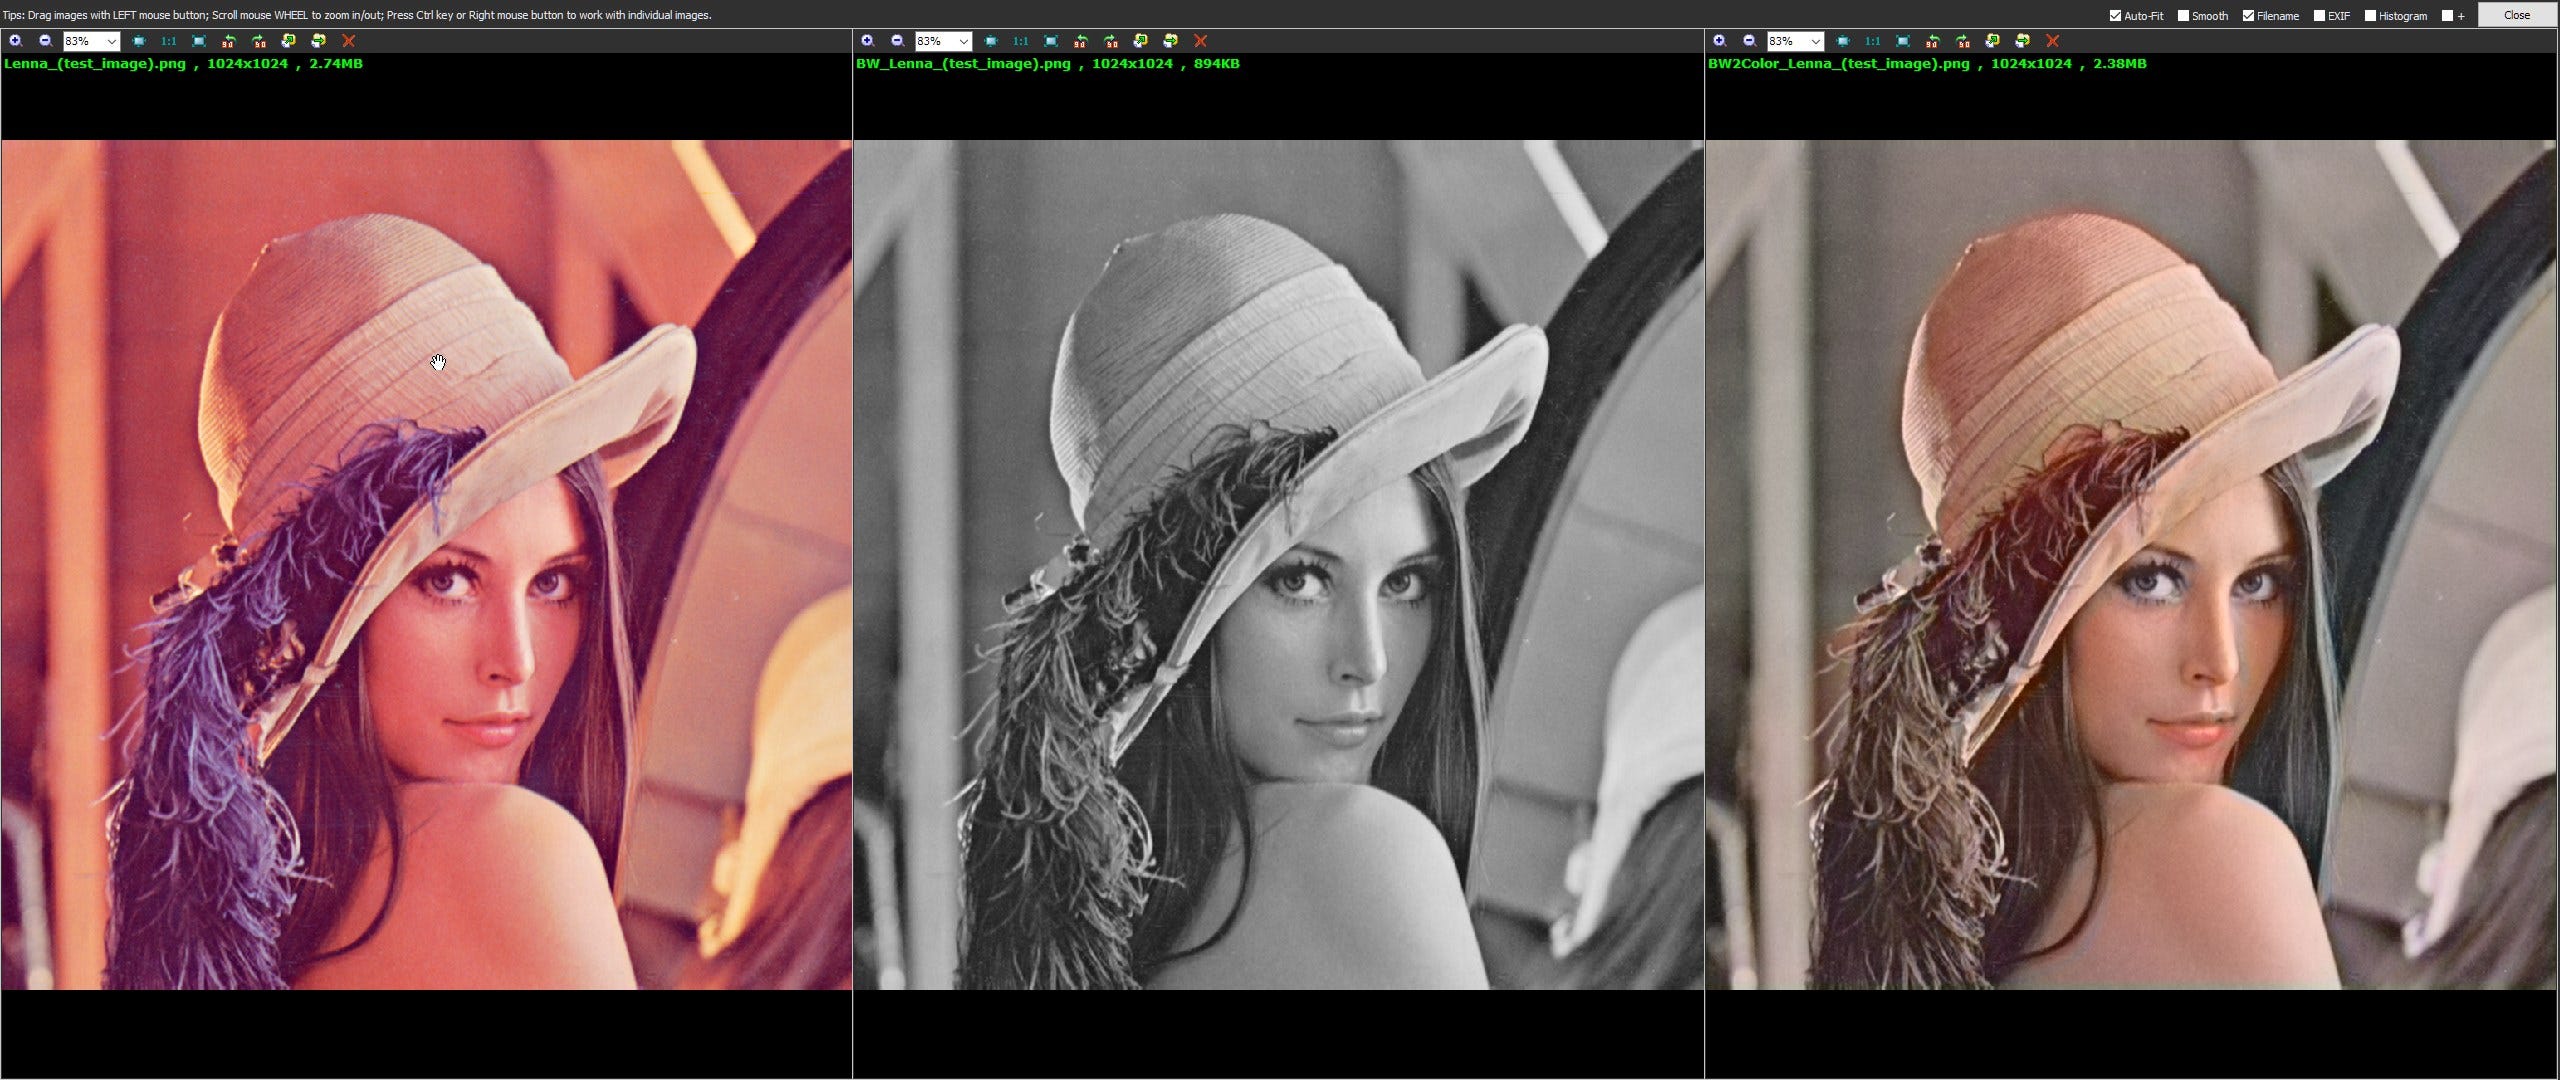
To test it out I took Lenna test image and converted it to grayscale to test it out. The results were not that great. It worked, it did colorize the important parts. My explanation for this lackluster result is that the image itself is quite challenging as most of the image is in a certain hue without much variation, and where there is variation it is captured nicely.

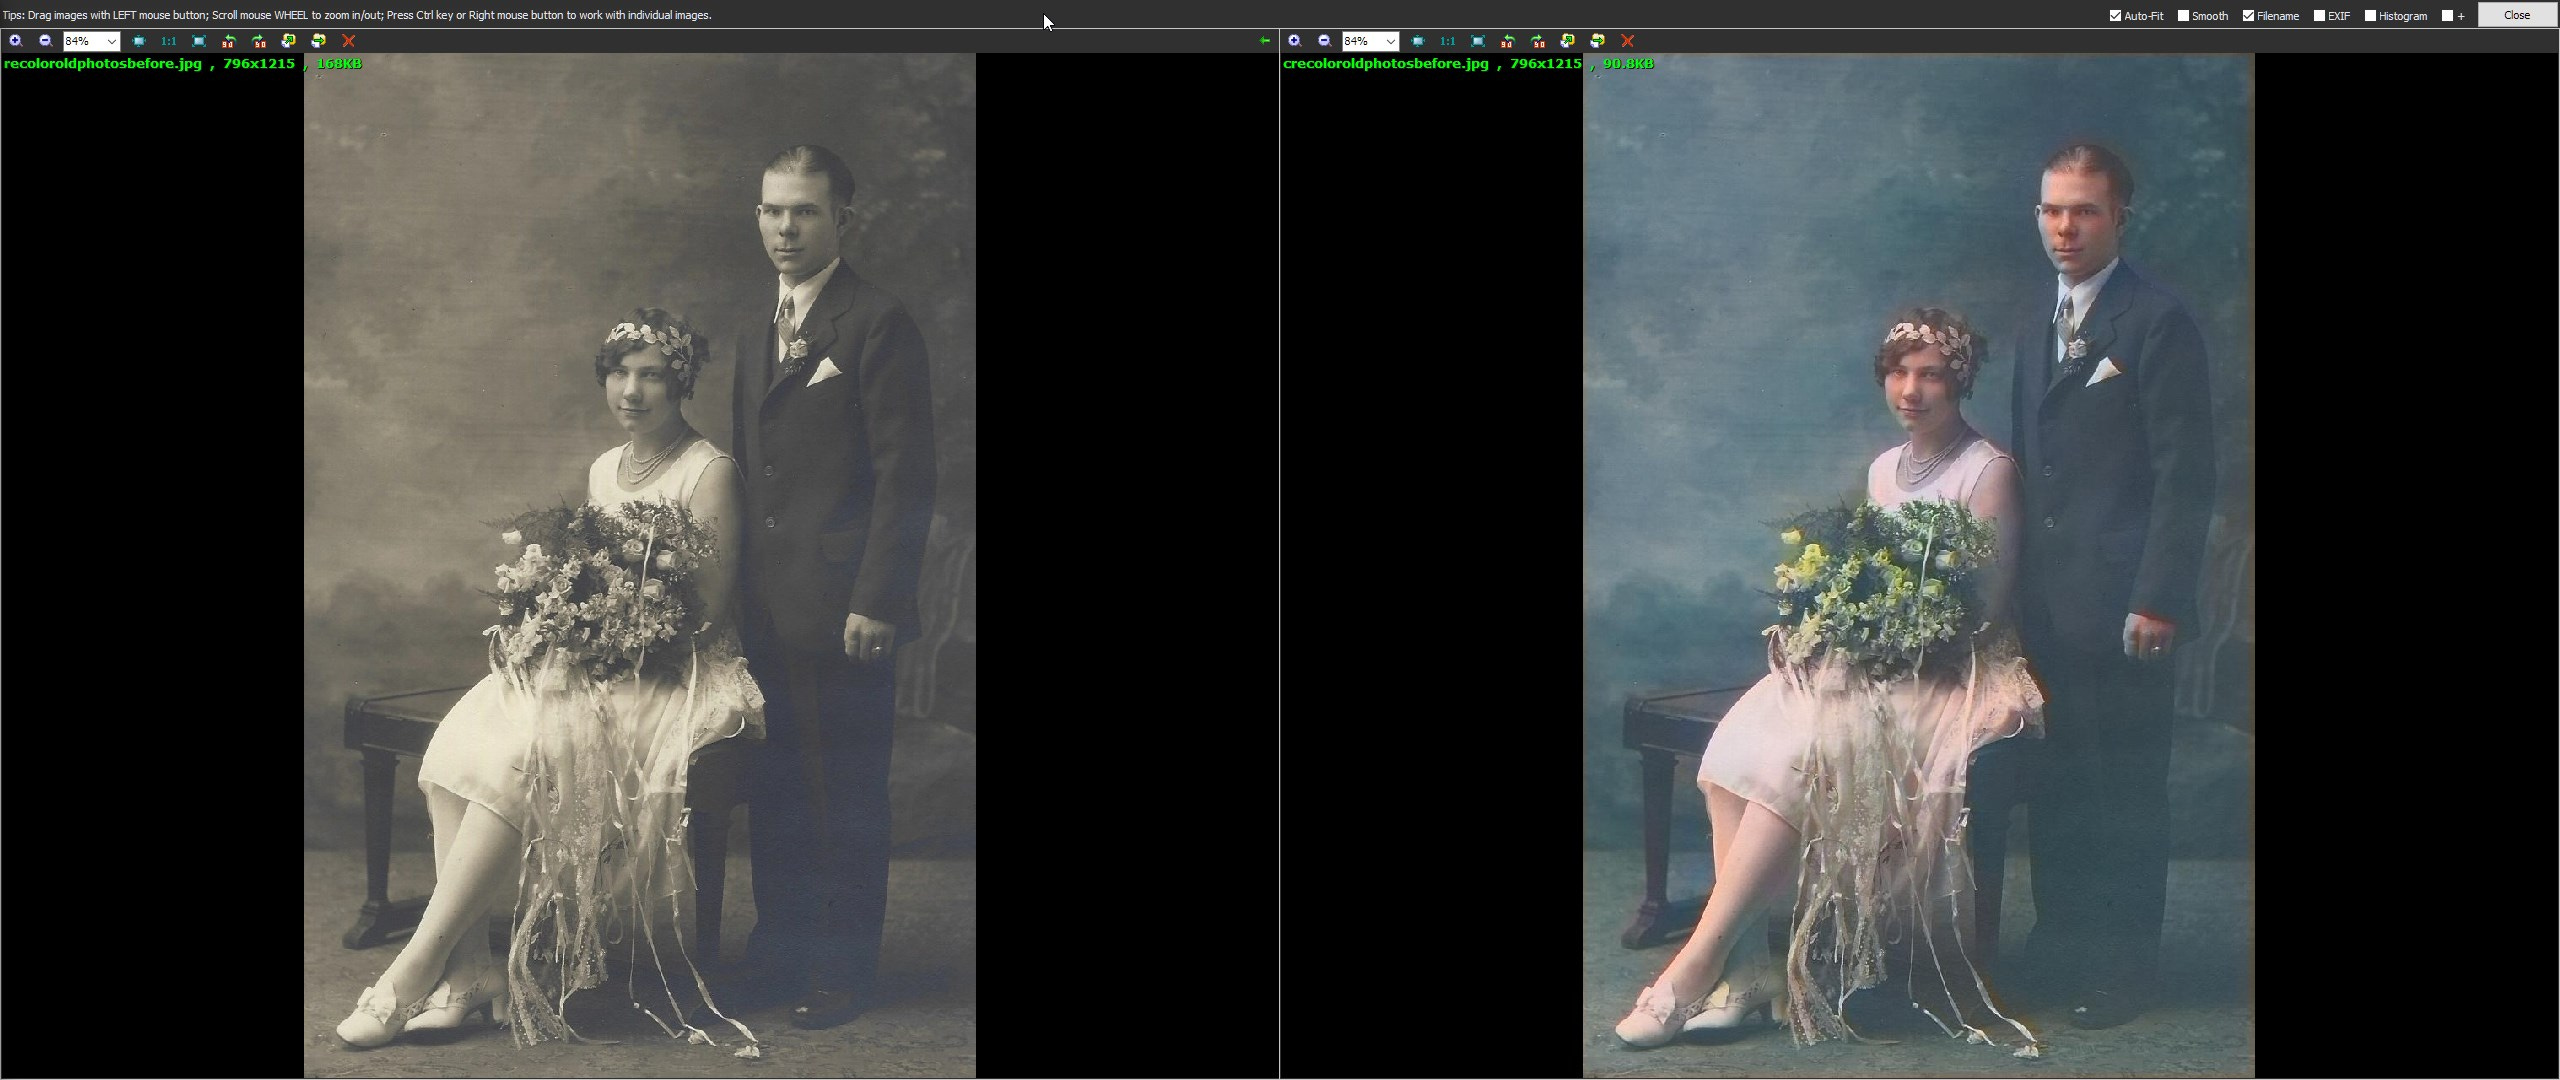
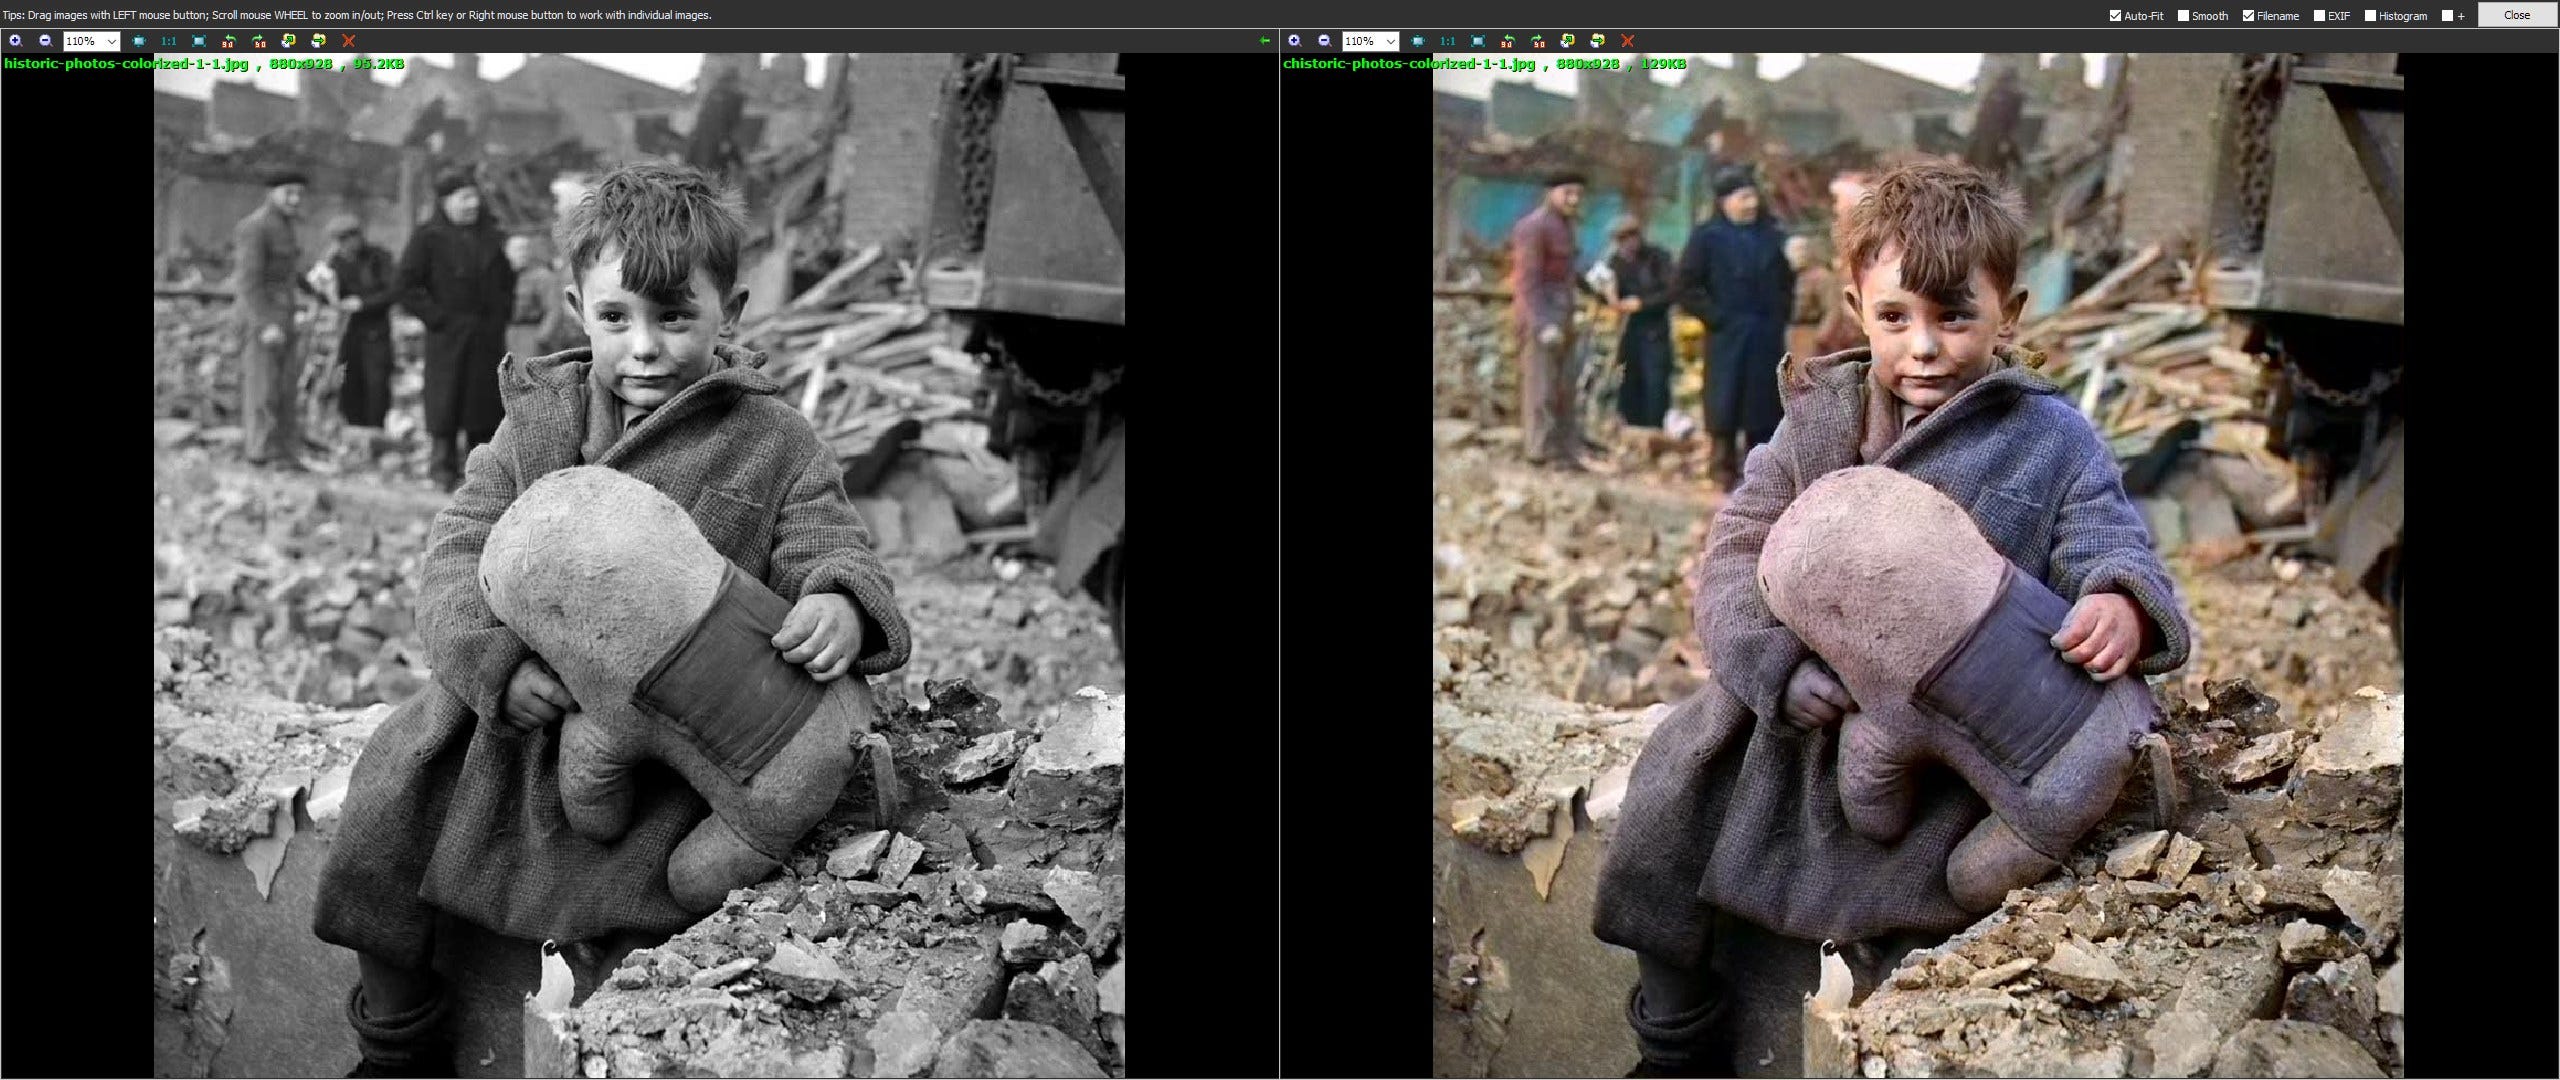
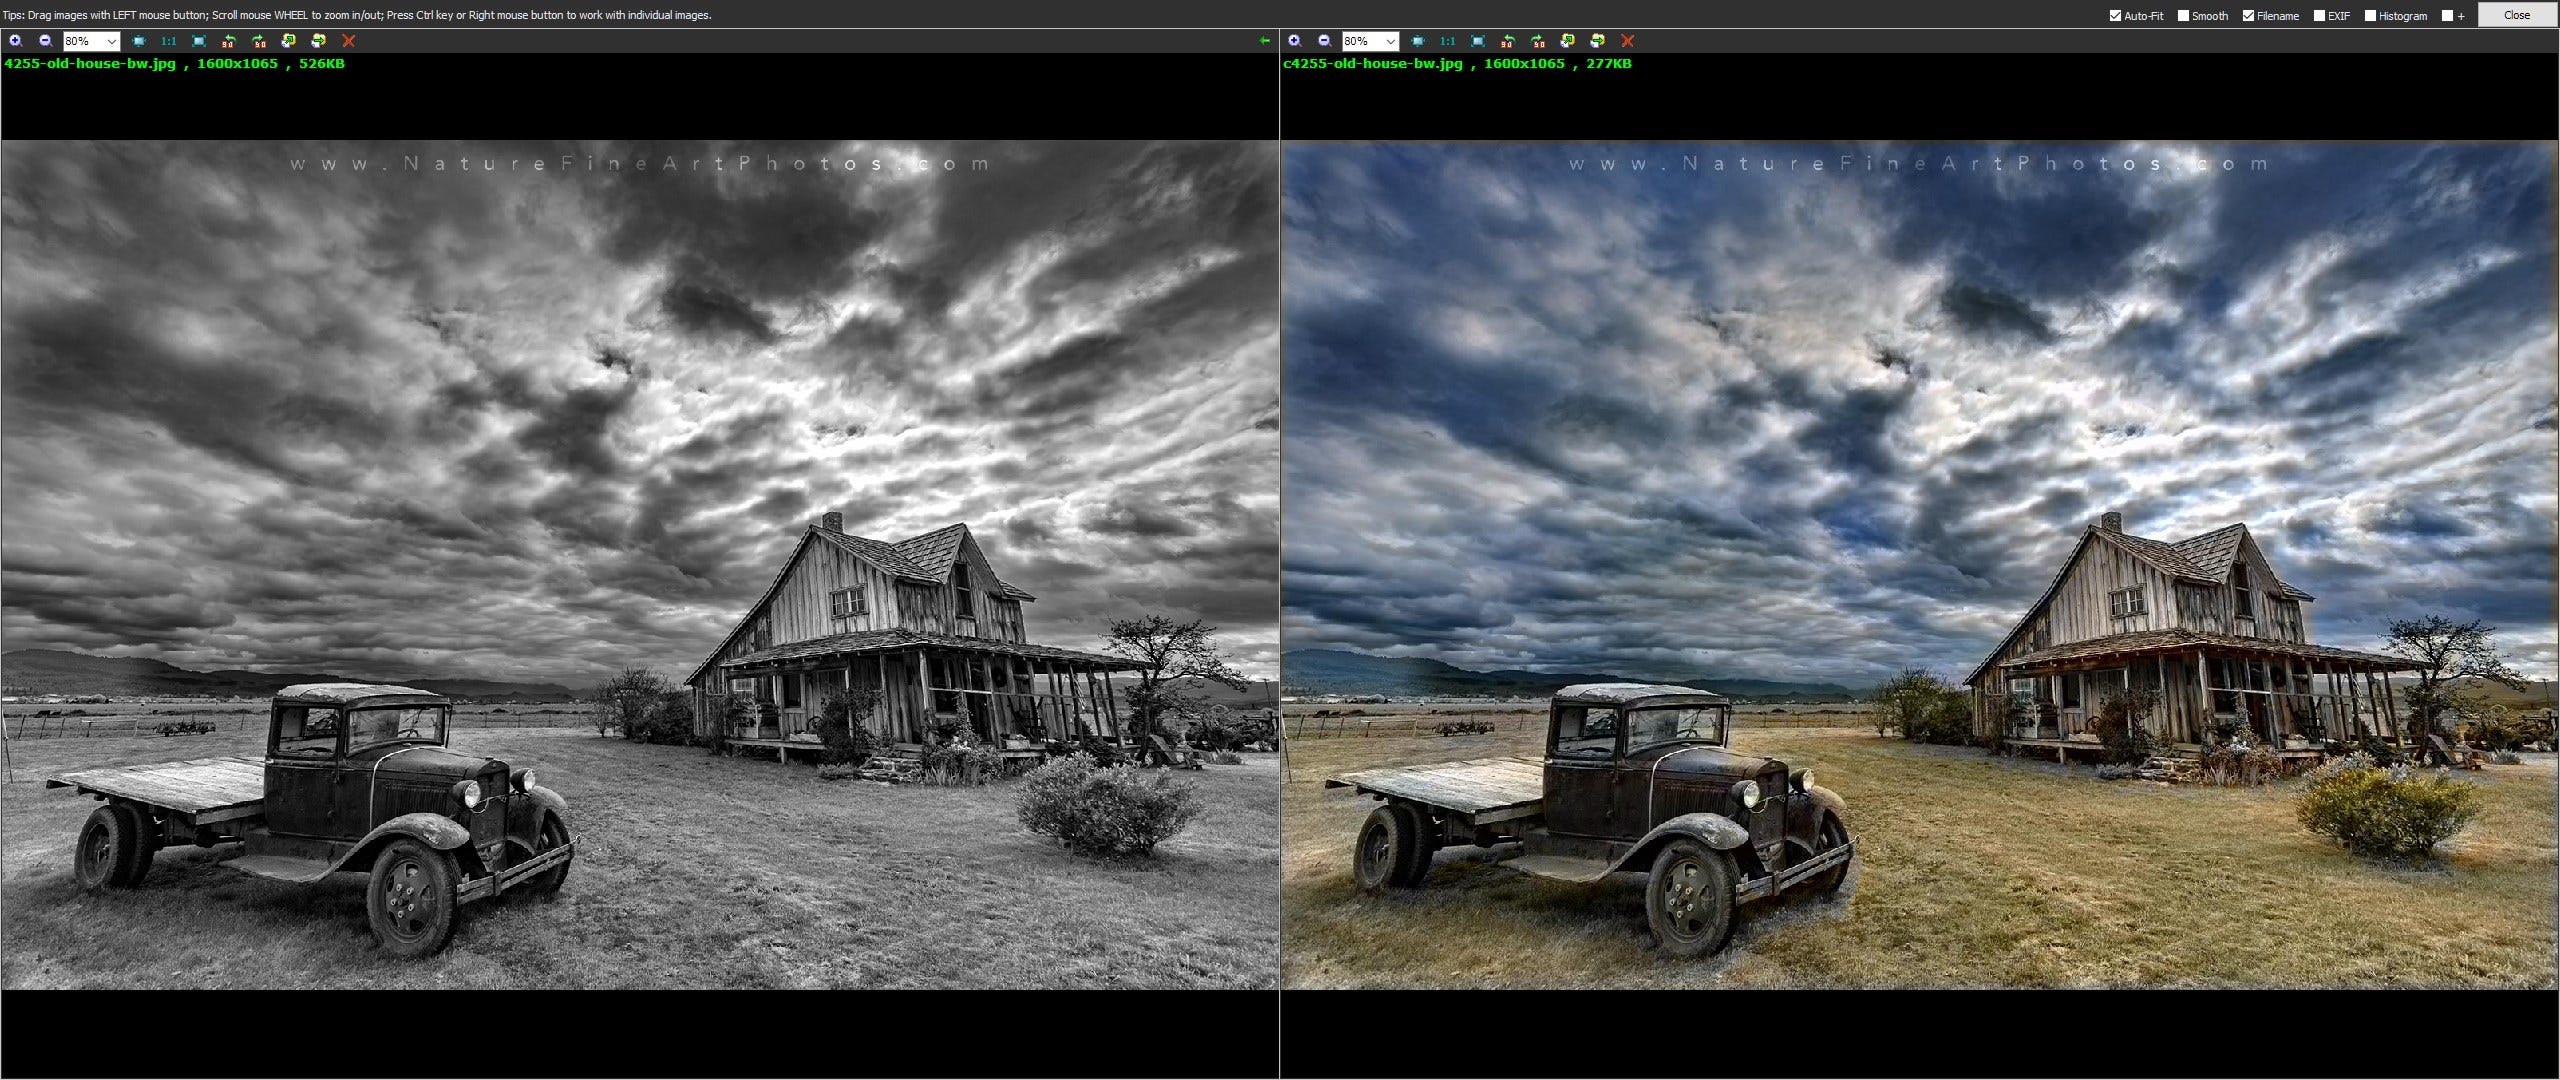
But, things changed once I tried some random pictures from the web. This just shows that there are limitations to this technique but it is impressive nevertheless. Just keep in mind that it’s not 100% perfect and will probably never be as the neural network used in DeOldify is basically “imagining” colors.