

18 Mb that could save You a lot of pain
18 Mb that could save You a lot of pain
or how to get into windows 10 if you forgot your password

A day ago I forgot my password for a Windows 10 system I use for work and it’s running in VirtualBox. As you might imagine, sweat started pouring down my back as I tried every combination of passwords I could remember and failed. It would be a nightmare situation if I were not an old hack, remembering old tricks.
In 1997, the first version of The Offline NT Password Editor by Petter Nordahl-Hagen was released and its development was stopped in 2014. I wasn’t sure if it would work for Windows 10 as it’s a newer system but as it turns out it does, rather painless.
And for anyone wondering what’s with that weird post image. Im using the AtlasOS version of Windows 10. This has no bearing on the process used to remove passwords. Im just putting it out there that there is a “better” version of windows than the standard Microsoft one.
Atlas is a modified version of Windows 10 which removes all the negative drawbacks of Windows, which adversely affect gaming performance. We are a transparent and open source project striving for equal rights for players whether you are running a low-end, or a gaming PC.
We are also a great option to reduce system latency, network latency, input lag, and keep your system private while keeping our main focus on performance.
To change or remove the password for the user you forgot the password for you will need to create a bootable drive. Today it’s easy to do with Rufus or some similar tool.
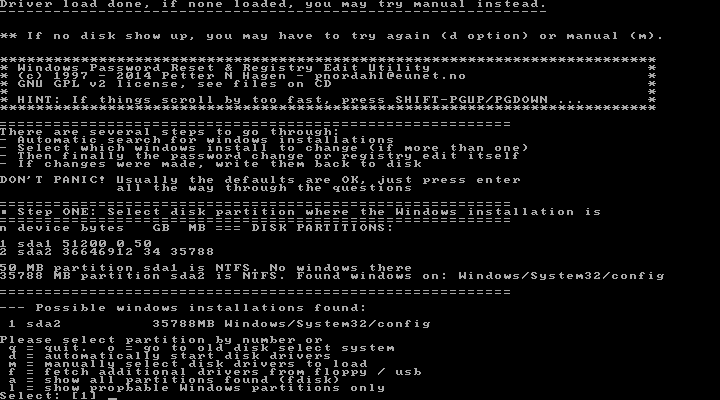
First of we need to download the ISO image from Offline Windows Password & Registry Editor, Bootdisk / CD website. There is a guide on how to use it and it’s still valid but it’s really really not for new kids. ISO image is just a copy of a standard CD bit by bit that a virtual CD drive can emulate and read as if we put a CD in our computer.
Once downloaded burn it to USB or in our case I add it to drives available to VirtualBox. And as VM starts up and the VM splash screen shows up I start manically pressing F12 to get the boot drive select menu.

After a short time for NTpassword to boot up, you will be presented with a selection of drives you can access. NTpassword will do a quick scan for your primary windows install and present to you its choice. In my case, it’s sda2 or option 1.
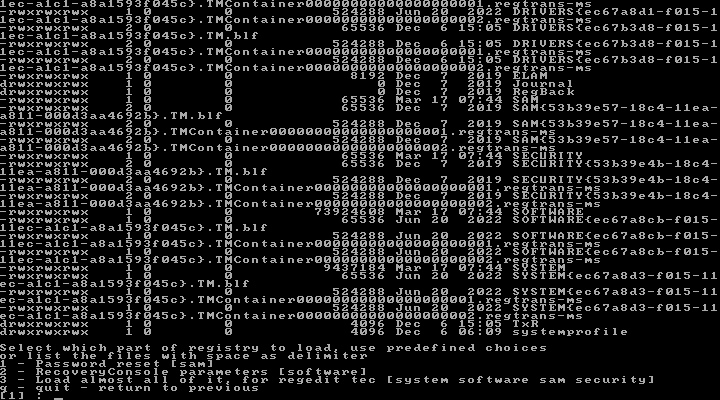
One entry press later and we are taken to a small menu of what we can do. We will want to go to the SAM or Security Accounts Manager database file in Windows containing usernames and passwords. Or option 1.
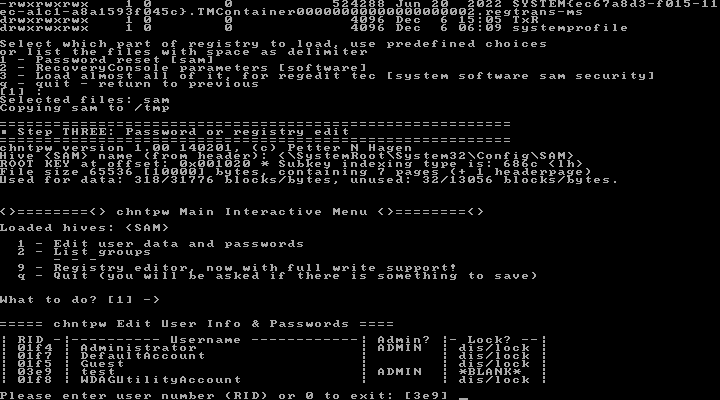
There we will choose Edit user data and passwords or option 1. There we get a list of accounts and their status. dis/lock means that the user is locked or disabled. You can enable and unlock them by entering their RID. You might notice that my Test user is already blanked out as I did this process earlier but wanted to share it with the world once again so that it doesn’t fall down the rabbit hole of memory.
Once again NTpassword is offering us predetermine option in the form of a user Test with RID 3e9 so we just need to press enter to continue.
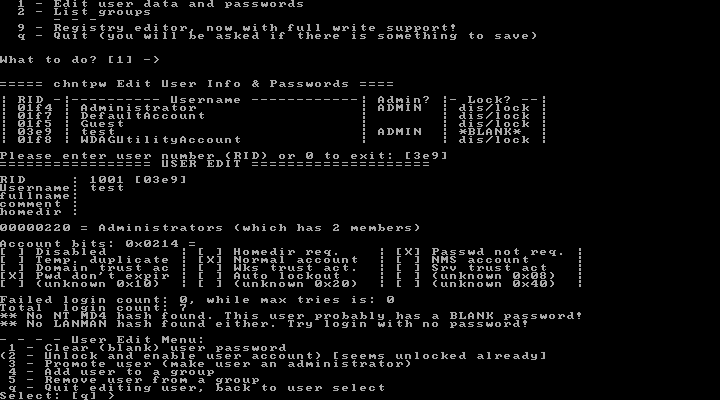
This takes us to the most complicated menu so far. If you selected the admin account you can enable it here or reset its password to blank. Here is the first time we need to press something other than enter key. To unlock press 2, to clear the password and set it to blank press 1.
Then q to return to user selection and then q again to exit that menu also. This time we will be prompted that SAM was changed and changes need to be written. The default option is set to No so we need to press y and then enter.
That’s it, now we can restart our computer and the selected user will be either enabled or its password removed. Remember to remove the USB or attached drive from the VM that was added. Now your system will boot to the default user without a password.
If you wanted to find out what that password was, well, that's a whole different thing and there’s this tool called Ophcrack.